 | We recently had a doll visiting for a few days, and as a thank you to the owner, a four-year-old girl who loves blue at the moment, I decided to sew a quick dress for the doll. I've created slopers for making doll's clothes before, and its a simple way to create a pattern and ensure a good fit. With a sloper made for the body and the sleeve, I created a pattern from some scrap paper. To make the pattern, just add a bit of ease along the side, and add a bit of flare to the skirt pattern. Since I'm using jersey for the dress, there's a lot of give and forgiveness in the fabric. I had a pile of old clothes ready to go to the charity shop and used this t-shirt to make the dress. A t-shirt is perfect for this pattern, since you can use the existing neckline and hem, and it was the right size for this doll. Cut out the front and back of the dress, using the existing neckline of the t-shirt. Use the hem of the t-shirt sleeve as the hem of the dress sleeve. As you can see on the left, the pattern for the arm is longer than the sleeve. If you use a long-sleeved t-shirt you could make a long-sleeved dress.
Sewing steps (not all pictured here):
1. Sew the shoulder seams. Check that the doll's head fits through the neck hole.
2. Sew the pockets onto the front of the dress. I first attached the pockets by hand before sewing them on with the machine, with stretchy jersey this means a lot less puckers!
3. Sew the sleeves onto the body.
4. Sew the side and under-arm seams in one go.
5. Sew the hem. I did a blind hem, but you can do any kind of hem.
Put the dress on the doll, and enjoy! You can add anything to this basic pattern, I added pockets, you could do contrasting pockets, add a gathered waist, use the pattern to make a t-shirt...
|

Wednesday 9 December 2015
sew a doll's dress from an old t-shirt
Wednesday 11 November 2015
tea towel calendars and a 2 for 1 sale
Every year spoonflower holds a tea towel calendar contest at the end of November. These calendars are designed to fit on a fat quarter of linen-cotton canvas. This year my design features sweet peas. I worked on the winding trellises of sweet pea flowers during a holiday in Germany a few months ago and enjoyed creating a seamless repeat. I love working with a scanner and a printer which I don't have at home, it means I can work on multiple versions of the design by hand, rather than doing most of the touch-up and fine-tuning on the computer.
I shared a photo of the process on instagram a while back:

While I'm still tweaking the repeating pattern, I decided to use this for a calendar, since the trellis shape was perfect to hold twelve months.
Here's the final design, which is for sale now in my shop:

A close-up photo of the colours printed on fabric:

I also finally updated my 2015 blackberry calendar for 2016. This calendar is available here.

Finally, spoonflower is having a 2 for 1 sale on all fat quarters, so you can either get both calendars for the price of one or choose any other fabric or type of fabric in my shop!
Thursday 5 November 2015
fabric blocks tutorial
A few months ago on instagram I posted a picture of some fabric covered blocks I made for my daughter. Here is a picture tutorial of how I made the blocks. I used an old greengate placemat that I had kept, hoping I could make something with the beautiful matching fabric. And the blocks I've actually had since I was 13, dragging them across various continents in the hope that some day I would get around to covering them! I made ten blocks.

- Prepare the fabric
- Measure your foam blocks and make a template - I made mine 1/4 inch wider than the blocks on all sides
- cut out squares of fabric

- Sew six squares together in a cross shape, starting and ending the seams 1/4 inch in from the edge of the fabric
- Sew Y-seams so that you have a little cube, leaving one edge open for turning

- Trim the corners of the fabric, turn the cube and poke out the corners
- Stuff with the cube and close the last seam by hand
Wednesday 7 October 2015
custom shower curtain
My sister asked me to design a shower curtain for her, she chose a design I already had (these purple hydrangeas) and said she'd like them in red. I sell shower curtains in my society6 shop, so I changed the colours, ran them by her, changed them some more, created a humongous file (the shower curtain measures 71x74 inches, so the file is pretty big!) and just uploaded it to my shop.

This week (until October 11th) I'm offering free worldwide shipping on all my products in my society6 shop, just follow this link!
I can't wait to see how the shower curtain looks in her bathroom, she's moving into a new apartment next month.
Monday 21 September 2015
frogging round two
Remember this sweater I decided to frog more than a year ago? Well I did, a bit, but then it sat and sat and sat and I tried many times to finish it, but just wasn't happy with the mistakes further down I had thought I could live with. So today I took it out of hibernation and did this:


A bit more drastic. And now I'm not really sure what to do. Take it all apart? (Remember, the back is done already). Do something else on the front? Try to redo the windmill. I don't think so, I don't really like the windmill. It looks nice, but the counting drove me mad, and it is supposed to be embroidered on but I was doing intarsia instead.
Thursday 13 August 2015

Tuesday 4 August 2015
free swatch today!
My designs are available on a new type of fabric - sport lycra - so if you've always wanted to make your own swim suit :-), then today you can get a free swatch (including free shipping) of any design in my shop.

Here's a link to the description of the new fabric and this is what it looks like!

Friday 3 July 2015
fabric shots - armadillo bison cardinal
This is what my set-up looks like to try to get good shots of fabric swatches. A white background, a sunny day but no direct sunlight, some white fabric rolled up to "fill" the swatches, and a bit of time to try out different things.

These are 8x8 inch fabric swatches printed on combed cotton from my collection "Armadillo - Bison - Cardinal" which I wrote about a few months ago. The samples printed with beautiful bright colours, and are now all available for sale in my shop.


These are 8x8 inch fabric swatches printed on combed cotton from my collection "Armadillo - Bison - Cardinal" which I wrote about a few months ago. The samples printed with beautiful bright colours, and are now all available for sale in my shop.


Sunday 28 June 2015
watercolour power tools
I've often mentioned spoonflower contests I enter. Recently I made it into the top ten for the first time which was incredibly exciting. The top ten designs are immediately set for sale and are part of a fat quarter bundle promoted on spoonflower for a week, which means more people see (and hopefully buy!) the design. Spoonflower also takes beautiful pictures of the fabric which are bigger than the fabric swatches I usually get. Here's the photo they took and this is where you can buy the fabric. I love how the colours turned out!


Watercolour power tools is a kind of strange combination, but I got inspiration to make this design from two people. My uncle is a fine woodworker and has an amazing shop where I love to hang out whenever I'm in Manitoba. I recently asked him for some photos of tools to use for a series of designs (here are some others I've made for the series: power saw and woodworking tools).
When I was in the Netherlands at Easter I visited my grandmother who has always encouraged me to try all kinds of things like painting, sewing, knitting and even leather work. I told her a bit about designs I've been working on recently and she gave me a beautiful block of watercolour paper. This was the first painting I worked on. I love the look of the watercolour paint on the fabric, and hope to do some more watercolour designs soon.
Monday 30 March 2015
armadillo baby bedding
This week for their weekly contest spoonflower teamed up with carousel designs, a design studio which offers custom baby bedding. The winner's design will be offered for sale through spoonflower as one of carousel design's lines of bedding. The theme was something I'm not very familiar with - Southwest US, but it was fun to research the theme, come up with ideas and colours and then for the whole design to come together. Here's the design I came up with, featuring three animals native to the southwest - the armadillo, bison and desert cardinal, as well as lots of cactus plants and diamonds.


There are very many amazing designs in this contest. If you want to, head here to take a look and vote! (voting closes this Wednesday).
Here's a mock-up from the carousel site to show how the fabric would look as baby bedding. I designed two coordinates (one is the blue diamonds below), and want to make a few more.
There are very many amazing designs in this contest. If you want to, head here to take a look and vote! (voting closes this Wednesday).
Thursday 26 March 2015
a new type of fabric - minky
I sell fabric on spoonflower where its possible to choose from many different types of fabric with my design printed on it. Every once in a while there is a new type of fabric available, and a few weeks ago minky was added. When I ordered my fox I got a little mini swatch in the package and wanted to share some pictures so you can get an idea of what the new fabric looks like. This page introduces the new fabric. Its very soft, a little bit stretchy and has a bright white background. All of my designs are now also available on minky fabric.

Thursday 5 March 2015
another sock monkey
At the beginning of the year I decided to finish one old unfinished project every month. (Actually, I thought I'd try every week, but that was a bit overambitious :-)). Last month I finished these little booties, and in February I finished this very pink sock monkey.

I bought these socks years ago with the plan to make a sock monkey out of them, at the same time that I made this monkey. The socks sat in my sewing box for years and now I finally got around to sewing them. Its such a nice pattern (there's a very clear tutorial with lots of photos here), but it does make a difference what kind of socks you use, i.e. how long the socks are, how big the feet are they're for. Its kind of cool how a few snips and stitches can transform a pair of socks.
Wednesday 4 March 2015
new shop
I've opened a new shop on society6 where some of my designs are now available on different products. From now until March 8 you can get free shipping if you follow this link to my shop!
Here are some of the products for sale:

I will be adding more designs, new ones and some that I already sell on fabric.
Here are some of the products for sale:
I will be adding more designs, new ones and some that I already sell on fabric.
fabric photos
One of the most popular fabrics in my shop is the design vegetable garden. I've written about the design before, which I designed as a tribute to my grandma and her garden. There are a number of different designs in the collection. Here is a photo of fabric swatches printed on cotton poplin for three of those designs (vegetable garden, gardening fruit and canning).

Tuesday 3 March 2015
mini trench coat
I made a trench coat years ago. I still wear it a lot but it really needs a new lining. I'm dreaming of a colourful one, the lining I have is black and falling apart at the seams.
Last week I made a mini trench coat. Have you ever designed clothes for dolls? Its so much fun to try to translate a normal sized pattern to mini. I used this tutorial about how to draft a sloper, and also got inspiration from this post about sewing a trench coat for a doll. A sloper is a pattern that is made to exactly fit your doll, so that clothes will fit well. Its fascinating :-). Since my fox isn't shaped like a person (well, I guess it is shaped more like a person than a fox), this means the trench coat fits the proportions of the fox.
Once I had the sloper I looked at a pattern for a trench coat and basically sketched out the pattern over the sloper, simplifying a bit as I went. I used a pattern from one of my burda magazines.
I love the finished coat, it has real working pockets, little belt loops, epaulets and gorgeous lining. I used a swatch of my cat damask fabric for the lining and a bit of leftover fabric from this project for the coat. And of course if you want to, you can sew the fox yourself with my cut-and-sew pattern. Let me know if you try a trench coat too!
Saturday 28 February 2015
a cut and sew fox
The fox is finished! I got the fabric in the mail a few days ago and sewed it together. One of our seat cushions got raided for stuffing, but other than that it was straightforward sewing. I took lots of pictures of the process in order to write a tutorial. Will post that soon, but for now, here's the finished fox. The fabric is for sale in my shop.

Thursday 19 February 2015
a Teumessian fox
I haven't entered any spoonflower contests for a long time, because I've been busy with other things (editing and revising mostly) but this week's contest really inspired me and I started doing bits and pieces a few weeks ago and finally finished my design just in time to enter. Every once in a while spoonflower has a cut-and-sew contest, which means, instead of just designing a pattern, you need to design a pattern for a three dimensional object as well. This week its stuffed animals, more specifically, mythical stuffed animals. I've always wanted to design a pattern for a stuffed animal, and have been playing around with ideas (and a few small prototypes) for years, so this time I finally started turning some sketches into drafts into prototypes into a finished design. I like it when I spend a lot of time on something over the course of a few weeks and feel like the finished product is what I had envisioned at the beginning.

I ended up making three different prototypes, changing the shape of the pattern or the way I put it together each time.

Here is some of the process:
I ended up making three different prototypes, changing the shape of the pattern or the way I put it together each time.
As you can (hopefully!) tell, its a little fox. I was looking for mythical creatures when I started and came across a fox that inspired me - the Teumessian fox from greek mythology that was turned into the constellation Canis Minor. I was also inspired by the foxes that live behind our house. Sometimes you can see them sleeping beside the train tracks in the sun.

Once I had the pattern finalised I transferred it to the computer and started the fun process of adding colour and design. I also designed a little dress for the fox to wear.
You can see the finished design here, where it will be for sale soon. I ordered a quarter yard of the fabric on linen-cotton canvas and am eagerly awaiting it so I can sew the fox with the real fabric and then write a tutorial for anyone who wants to buy the fabric and make the fox. So, more soon hopefully!
Be sure to check out the other designs in the contest and vote, it starts tomorrow.
Wednesday 28 January 2015
felt hair clip
Just after Christmas I started sketching ideas for more little things to make with felt. I came up with this little sketch of a cherry blossom and a leaf, thinking of making it into a little felt hair clip. Now I finally put it together. This is a rough draft, I want to refine it a bit, and then maybe make a pattern / tutorial.

Tuesday 13 January 2015
inspiration and learning
One of the main focuses of my blog is to share things I learn (for instance through the tutorials I post) and places where I find inspiration for designs.
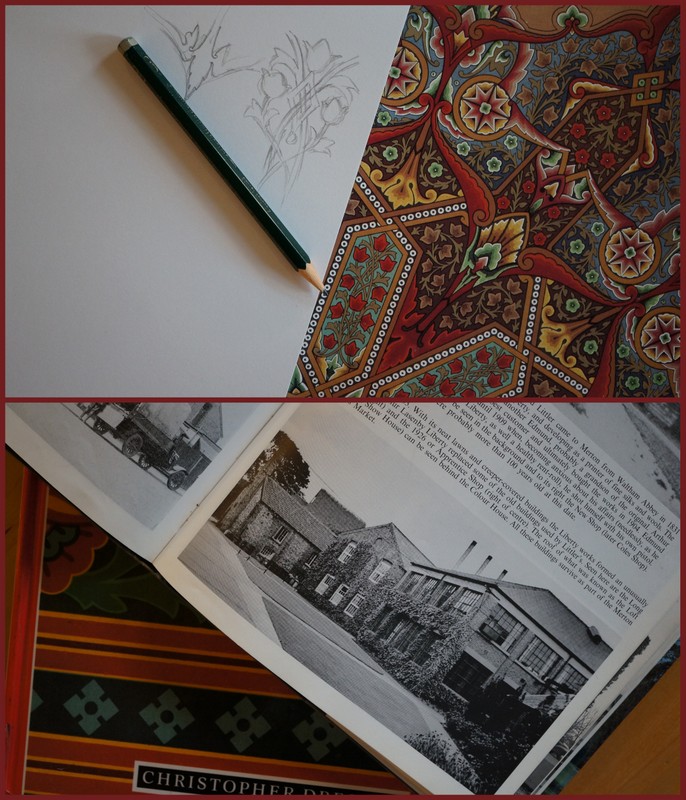
I love to browse through the library, picking up books about design, artists, knitting, gardening, cooking etc. When I have a bit of time at home I leaf through the books, get inspired and learn new things.
I love design reference books and have recently started analysing how designs are put together by sketching elements of the design. Actually putting a pencil to paper helps me to see better how the design works.
In the bottom picture there is a book I borrowed about the history of Morden and Merton. The house in the picture is where liberty fabric used to be printed. After looking that up I came across Merton Abbey Mills, close to where we live and a place I'd like to visit some time!
Monday 12 January 2015
tea towel calendar
I posted earlier about my tea towel calendar design for 2015. Since I gave a few tea towels as christmas gifts, I didn't want to post photos in December. Here is a picture of the finished tea towel. I ordered the linen cotton canvas and hemmed the edges. The fabric is now available for sale in my shop.

Friday 9 January 2015
inkscape tutorial - create a union of different objects
When I work in inkscape it's often helpful to create a union of different objects. This is similar to grouping them, but rather than creating a group of different objects, a union functions as one object. This is useful if you have many small objects in a design like the dots on my rosehips below.
Inkscape seems to be a bit buggy when it comes to very large files with many groups of objects. Reducing the number of groups helps when working with large designs.

Step 2: Select all the objects.
Step 3: Under path click on union. Or use the keyboard shortcut CMD +
Step 4: The row of dots now functions as one object. Change the colour, or move the object to a different position.
ps. do you like the pattern? Its one I've been working on the last few weeks. I'll share more when its done.
Tuesday 6 January 2015
baby booties
Happy new year! I hope you all had a lovely break. I'm back in London after two weeks in Germany and the Netherlands.

In a burst of "finish old projects at the beginning of a new year" I finally finished these little booties yesterday. Thankfully they're still a little bit too big, so its okay that they sat around for over a year waiting for the second button.
Now lets see how long the "finish old projects" feeling lasts...
ps. I posted details about the booties on ravelry. If you knit and are on ravelry, feel free to connect!
Subscribe to:
Posts (Atom)